16.1. Make a pull request to the afni repository
16.1.1. Introduction
git-ese), and thanks
in advance for your interest+contribution.You will need to have a github account for this process.
Comment
This page describes how to make a fork+branch+PR in several steps. But, following the proud tradition of several online tutorials, it doesn’t describe what to do when things go wrong. (Our reason, at least, is that there are too many ways for things to go awry.)
However, don’t panic. There are lots of git commands for fixing
changes at various stages of committing/pushing/etc., and feel free to
use those if the need arises. Those might keep you from losing a lot
of work, and they are valuable to learn.
But if worse comes to worst, you can move/remove your fork or branch, make a new one, and start afresh. While this might take a lot of time, you won’t be doing anything bad to other people’s code. As part of this, we note that it is very useful to keep a backup of your changes outside of the git repository (repo). That way, if things go awry, you shouldn’t lose all your hard work.
git syntax is challenging, and it takes a while to get
comfortable with it. So, we might suggest just using git in
whatever form is the best way possible to help your work flow.
16.1.2. How to make a pull request
Note: some steps incorporate your account or username. We
highlight references to that by referring to it as USERNAME. In this
specific demo, USERNAME = mrneont. When you are working at your
computer, substitute in your own username in such cases.
git commands can be run anywhere within your local git repo.
Commands that refer to specific files can include paths.
- Fork the repo. Go to the AFNI source code github page:and click on the “Fork” button in the upper right hand corner:
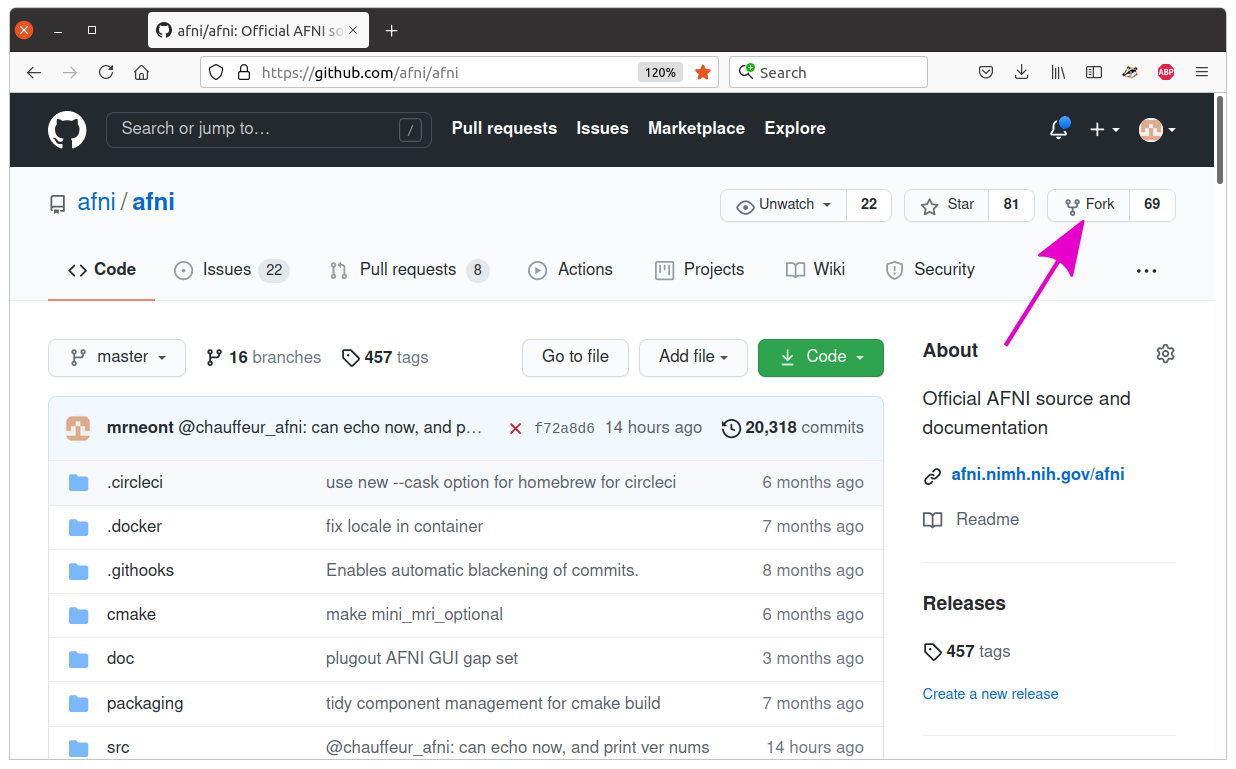
... and just select to fork it to your own github USERNAME (here, USERNAME is “mrneont”):

Clone the repo. That step should bring you to your user account’s new webpage for the fork of AFNI, which should likely be at a webpage like
https://github.com/USERNAME/afni. There, click on the large green “Code” button:
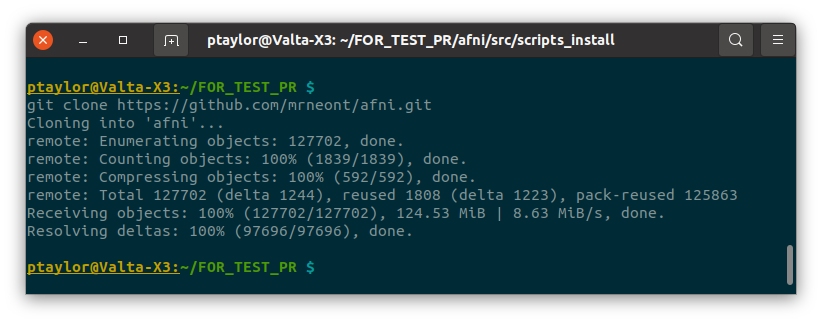
This shows you a link to copy. In a terminal, navigate to a directory were you want to put your copy of the AFNI repo. Then type
git clonefollowed by that link:git clone https://github.com/mrneont/afni.git
Make a new branch. Right now, the body of code you downloaded is the “main” (or “master”) branch. To make a pull request, you will make a new branch, that can be named whatever you want (perhaps something meaningful to your project).
Move into the repository, and use the following to make a new branch (note the
-boption here, which means we are making a new branch; without this option,gitassumes you are moving into a pre-existing branch):cd afni/ git checkout -b test_ramus

(opt) Check your current branch. To see what branch you are in (and current one has asterisk):
git branch

Add/make changes in the branch. Now, make your desired change(s) in your branch. This can include adding a new file, editing an existing one, etc. Here are just a couple examples of copying in a new file, and opening and editing (not shown; use any text editor or just copy in an already tweaked copy) an existing file, respectively:
cd src/scripts_install/ cp ~/SurfLayers . emacs ../python_scripts/scripts/1dplot.py

(opt; recommended) Check changed files. It is useful to see how many changed files you have before making the PR. This helps ensure that you have made all the changes you want—and aren’t about to accidentally push in changes that you didn’t:
git status
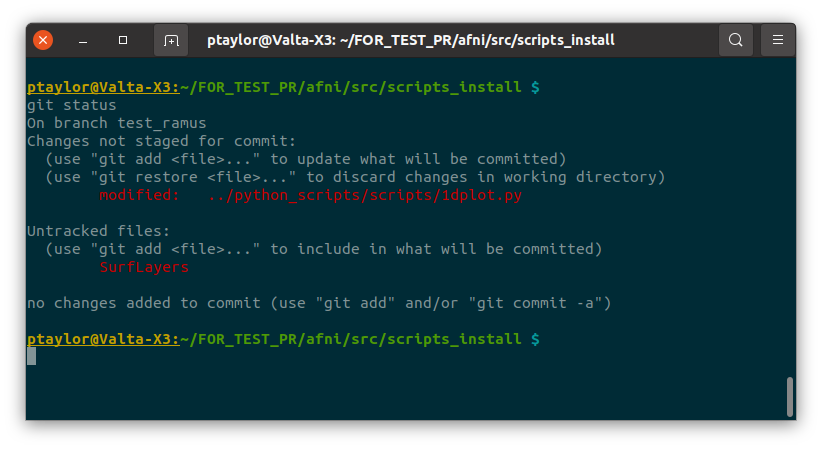
Note how the new file is untracked—we haven’t added it to to local repo yet.
(opt) Add a file to the repo. As noted from the previous step, just because a file sits in this directory, that does not mean git will track it. If we are adding a new file as one of our changes to the repo, then we have to instruct git to take note of it (we can add one or more files in this way; using paths within the repo is fine):
git add SurfLayers
It is possible to
git remove ..one or more files, too, in the same way.And let’s check the new status of the repo:
git status
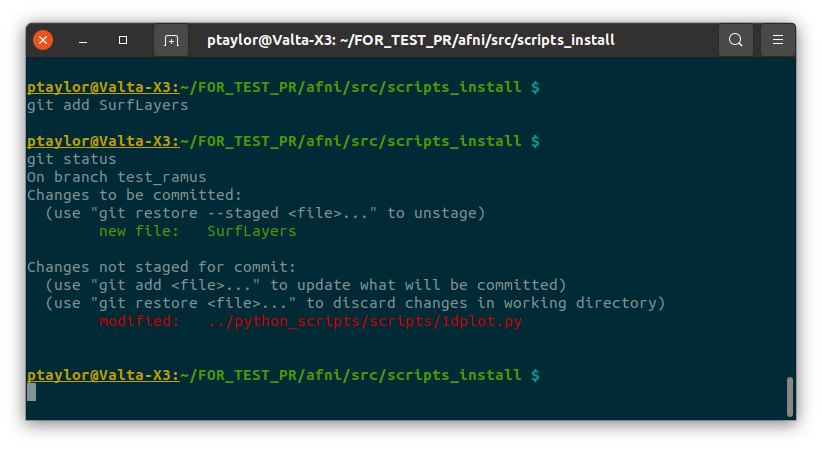
Great, now that file is no long ‘untracked’, so it will be part of our git-world.
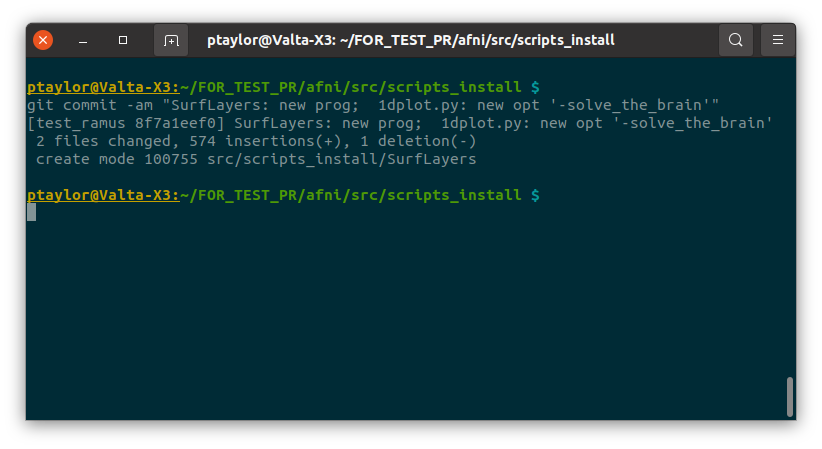
Commit changes. Let’s say that that is all of the business for the pull request. Now we will
commitall those changes, with a descriptive message (hence the-amhere):git commit -am "SurfLayers: new prog; 1dplot.py: new opt '-solve_the_brain'"
(opt) Check status again. Just out of interest, you might want to see what the status of the repo is now:
git status
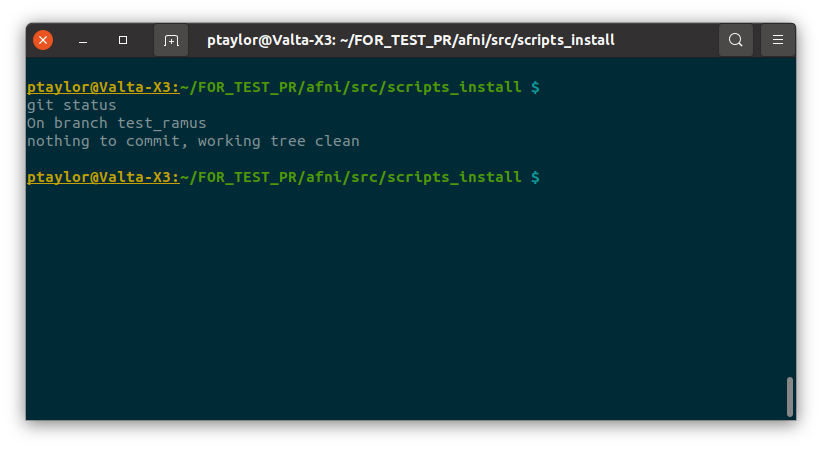
Our work has been committed on local repo, so no changes are apparent. But we are not done: we have only made a local commit, and we have to push our changes to the remote repo.
We could also continue to make more changes in our local branch and commit those, before moving on to the next step. We can accummulate several commits, and then push them all at once.
Push branch to remote forked repo. Now, we will push all of those committed changes to the remote forked repo. The name of the remote branch should be ‘origin’ (this can be verified by first running
git remote):git push origin test_ramus
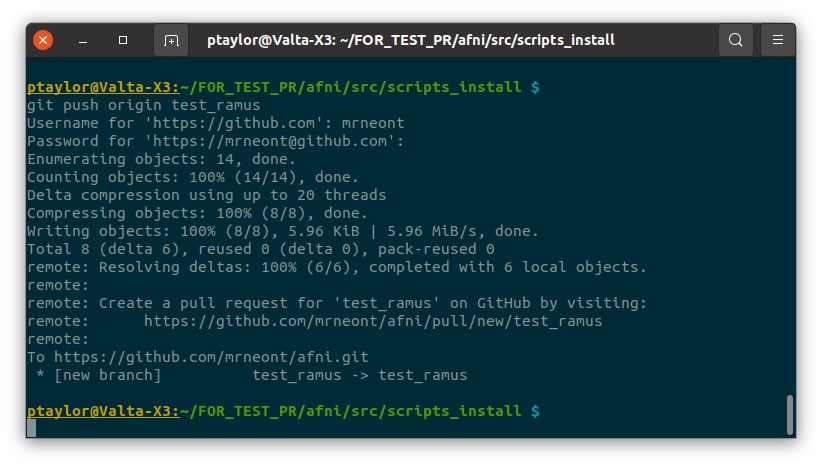
Now, our branch in the remote location is updated. The
commit ..added changes to our local branch, and thepush ..sent them to the remote repo.We could continue changing our local files, and committing and pushing to the local branch and remote fork, respectively. When we have as many of these changes added+pushed as we want, then we can make our pull request.
Make pull request (online). Now, we can make a pull request to merge the changes that are sitting in our branch (the commit added them to our local branch, and the push sent them to the remote branch) into the main/master branch. To do this step, let’s go to the web interface.
Navigate to the afni source code github page in your browser:... and you will again need to be logged into your git account.Looking at the webpage, you will likely notice that there is a notification about the push to the branch:

You could click on the big, green “Compare & pull request” button now (if you do so, skip down to the “Finally”, below).
Or, if you don’t see that there for whatever reason (maybe fleeting time has passed, and other notifications sit there), then you can click on the gray word “branches” that is a few items to the left of the “Code” download button from earlier. Click on that “branches” to see a menu of branches, find your branch under “Your branches” (OK, fine, the terminology here does seem intuitive in
git) and click on the “New pull reqest” button to the right:
Finally, you are one step away from completing your pull request. As the interface you should be looking at shows, you can add a comment/message to your request:

Note: the buttons below “Open a pull request” describe where your pull request is coming from (here, the “head repository” and “compare”) and where it is requesting to be pulled to (here, “base repository” and “base”). The default base repository for the PR is AFNI’s, and the default branch is master. So
afni/afni:masteris therepo:branchthat your changes would be pulled into, if that is what you want.The comment can be things like: an explanation of why you are making this PR, descriptiion about the specific code changes (what programs added/changed and why/how), pinging someone to take a look at your PR (start typing
@, and you should get a menu of possible names to complete), etc. All of these are good things, particularly if you are making this PR out of the blue. This may be the start of a discussion, possibly leading to further changes in your branch before accepting the PR.After filling in some comment, hit the big, green “Create pull request” button:
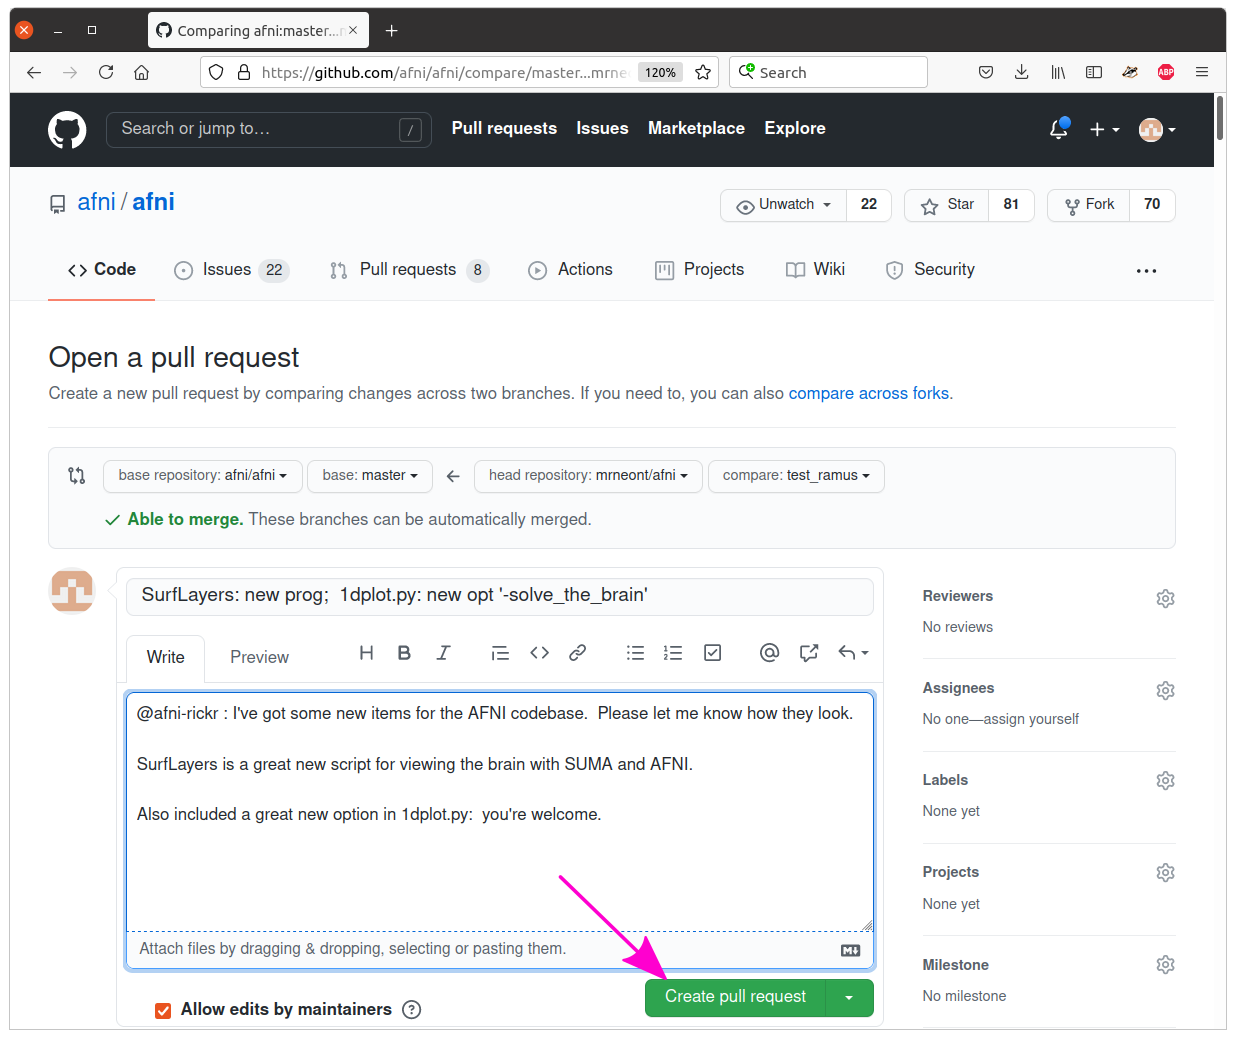
... and you should get brought to a screen like this:
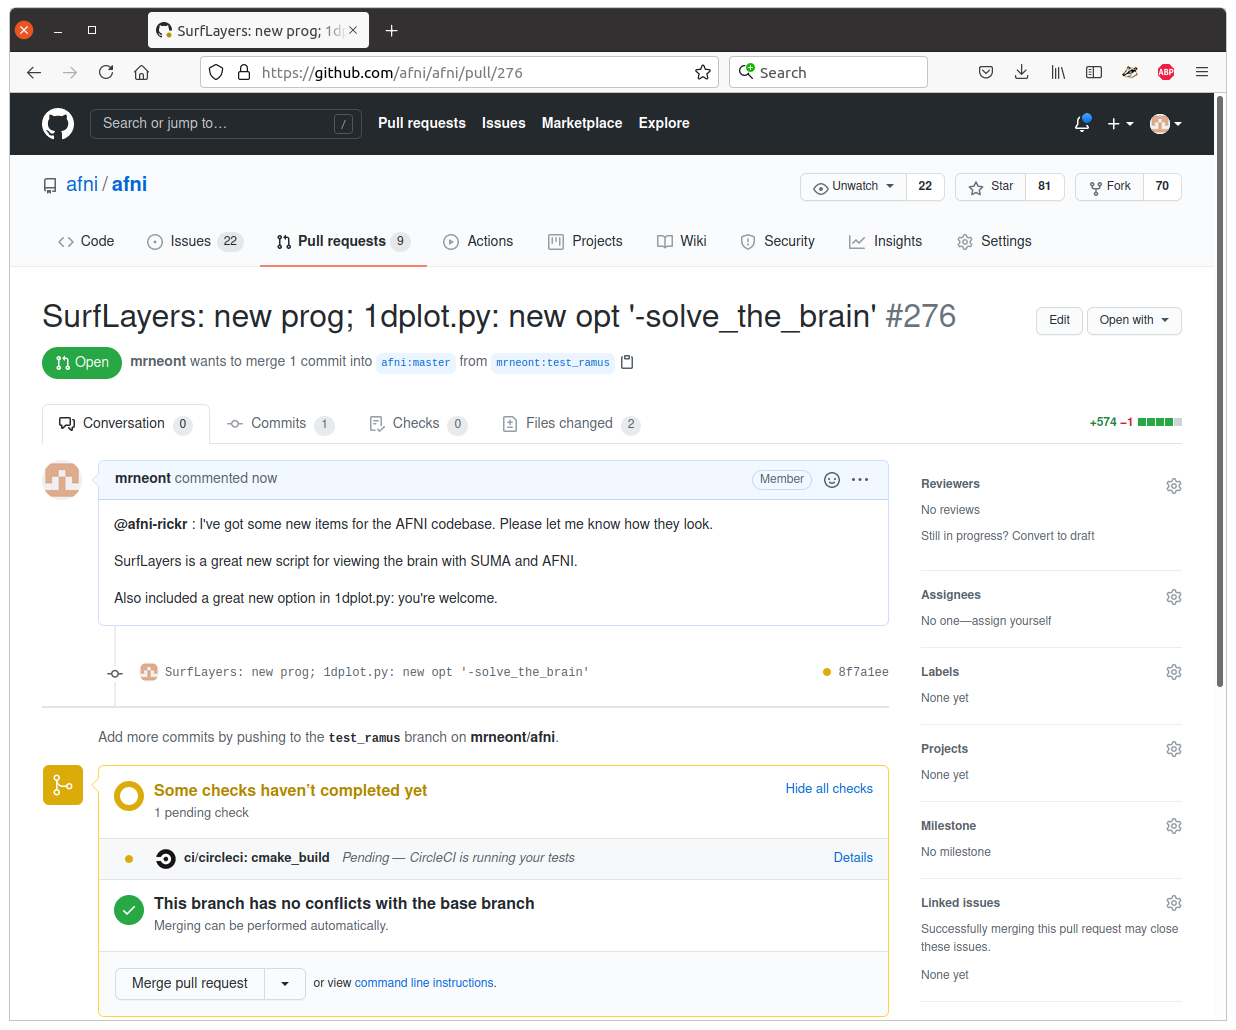
You’ll notice some automatic checks will be taking place within “CircleCI”, and some automatic checks for conflicts within the git realm should also have taken place. You can also click on the “Pull requests” tab at the top, and see the list of open PRs, of which yours should now be sitting at the top:

Congrats. After this point someone might contact you about this PR, likely using the github page as a discussion thread. And thanks for your contribution.
16.1.3. The quick version: Make a PR
Lo stesso, alla breve.
Fork:
click the ‘Fork’ button (should be in the upper righthand corner)
in the menu that opens, select to fork it to your USERNAME account.
Clone (can also get the following web address from clicking the “Code” button on your forked repo’s github page):
git clone https://github.com/USERNAME/afni.git
Make a new branch:
cd afni/
git checkout -b test_ramus
Make some changes in the branch.
Check changes and what is ready to commit:
git status
If necessary, add any new files you want to the repo:
git add SurfLayers
Commit your changes:
git commit -am "SurfLayers: new prog; 1dplot.py: new opt '-solve_the_brain'"
Push to remote:
git push origin test_ramus
Hop online and start clicking buttons.
If you want get there in style:
afni_open -b https://github.com/USERNAME/afni
... and then click “Branches”, which is a bit to the left of the big, green “Code” button.
Or to be extra-fancy about it, jump to the branches page directly:
afni_open -b https://github.com/USERNAME/afni/branches
Et voila.
Under “Your branches”, click the “New pull request” button for your particular branch.
Enter in a comment to describe what you contributing. Then click the big, green “Create pull request” button.