5.1.6. AFNI GUI: Datamode panel

Define Datamode

Open Define Datamode Panel

  • Click the Define Datamode -> button to open the datamode panel.

  • This controls the mode in which the underlay and overlay are viewed.

  • Also allows you to save 3D datasets to disk.

  • The datamode panel will overlap the Define OverLay -> panel. But clicking either will bring that one to the front.

../../_images/datamode_open.png

Underlay Settings

  • View ULay Data Brick Data from the underlay file is displayed. (will be grayed out if data is not available)

  • Warp ULay on Demand Data is resampled as needed for display.

  • ULay Resam mode This controls the resampling mode for the underlay data (for display and writing).

    • NN = nearest neighbor (fastest)

    • Li = linear interpolation (OK)

    • Cu = cubic interpolationg (nice but slow)

    • Bk = blocky interpolation (between NN and Li)

  • Resam (mm) Set the (cubical) voxel dimensions for the data resampling.

../../_images/datamode_ULay.png

Overlay Settings

  • View OLay Data Brick Data from the overlay file is displayed. (will be grayed out if data is not available)

  • Warp OLay on Demand Data is resampled as needed for display.

    • Overlay data is always on top of underlay data. To be displayed directly from the overlay data brick, this brick must conform in dimensions to the underlay data being displayed.

    • Even if the overlay brick exists, if its dimensions do not correspond to the underlay brick or the resampling dimension (below), then the overlay data being displayed will be ‘warped-on-demand’. Such warping always occurs from the ‘most original’ source.

    • For example, if a Talairach view brick is altered (via a plugin, or another external editing program), then viewing the brick may be quite different from viewing the warped data, which will be recomputed from the Original view brick (if available), without reference to whatever alterations may have been made in the Talairach view.

  • OLay Resam mode This controls the resampling mode for the overlay data (for display and writing). This applies to dataset sub-bricks without statistical parameters attached. (choices are the same as the underlay).

  • Stat Resam mode Same as above but for dataset sub-bricks with statistical parameters.

../../_images/datamode_OLay.png

Saving Resampled Datasets

  • The purpose of the Resamp buttons is to recompute entire dataset bricks in the current coordinate system (‘view’) and write them to disk. The various Resamp controls determine the resolution and interpolation method used in creating the new bricks.

  • ULay writes the current underlay dataset brick.

  • OLay writes the current overlay dataset brick.

  • Many allows you to select one or more datasets from a list.

  • Only dataset bricks that are warped from a parent dataset can be written out.

  • Resamp will not destroy original data (The Bob has spoken).

  • This operation might be very time-consuming, especially for big 3D+time datasets!

  • Resampling a big 3D+time dataset to 1 mm grid size is usually pointless and will use up a LOT of disk space.

  • You can write a dataset to disk under a new name (but not resampled) using the SaveAs buttons.

../../_images/datamode_Resamp.png

Save As

  • The SaveAs buttons let you write out one of the current datasets (Underlay or Overlay) under a new name.

  • These datasets will be written at the spatial resolution they are stored in – they won’t be resampled.

  • Datasets that are ‘warp-on-demand’ (don’t have their own data) cannot be SaveAs’ed!

  • If you do not give an extension, the dataset will be saved in afni format.

  • If you give a .nii extension, you will get an uncompressed nifti dataset.

  • If you give a .nii.gz extension, you will get a compressed nifti dataset.

  • It is possible to over-write an existing dataset with SaveAs, but this is usually NOT advisable, unless you are going to quit AFNI almost immediately.

../../_images/datamode_SaveAs.png

Rescan and Read

  • Rescan buttons read the contents of session directories again in order to make newly created datasets (e.g., from the 3dmerge program or the SaveAs button) available for AFNI viewing.

    • This rescans just the current session. This has the same effect as clicking the UnderLay or OverLay buttons in the main panel after adding new datasets. (See here.)

    • All rescans all session directories.

    • *.1D rescans for timeseries files instead of AFNI datasets. Note that the program won’t re-read a filename that has already been read in. This means that if you change the contents of a .1D file, AFNI will not be aware of that fact even after this rescan operation.

  • Read buttons read in new data. (The Rescan buttons are to re-read data from old directories.)

    • Sess opens a directory chooser window to read a new session directory. This has the same functionality as the Read button in the main controller panel. (See here.)

    • 1D opens a file chooser window to read a new timeseries file.

    • Web opens a dialog box to enter an address to read datasets from the Web. e.g., https://some.place/dir/anat+orig or ftp://some.place/dir/func.nii.gz. You can also read from a list of datasets by using https://some.place/dir/AFNILIST where AFNILIST is a text file with one dataset name per line (will be fetched from the same Web directory; do NOT put ftp:// or https:// in the AFNILIST file!).

    ../../_images/datamode_Read_Web.png
../../_images/datamode_ReScan_Read.png

Lock

  • The Lock button drops down the menu of controllers which should be ‘locked’ together in their viewpoint coordinates.

  • The lock will only take effect when you next move the crosshairs, or click on the Enforce All button.

  • By default all controllers are locked in regards to their viewpoint coordinates. Also Zoom lock and Free Thresh are selected.

  • Changing a setting on one locked controller will apply that setting to all locked controllers.

../../_images/datamode_Lock.png
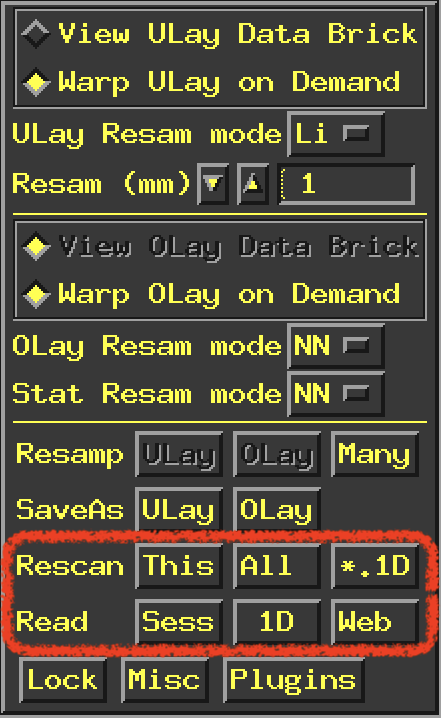
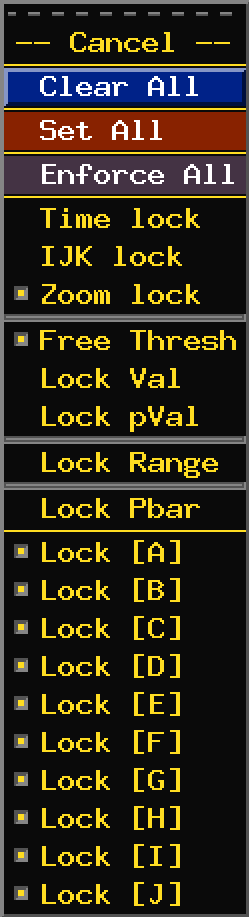
  • The first 3 options (in colors) are shortcuts.

  • Clear All will unlock all controllers. You will get a warning popup the first time you click this telling you how to undo it.

  • Set All is the default and will re-select all controllers if you have unlocked some or all.

  • Enforce All will automatically sync the viewpoints on all of the controllers.

  • Time lock will lock the Index of each controller if the underlay has multiple sub-bricks (as in a time series dataset).

  • IJK lock will change the viewpoint locking to match the “i j k” coordinates of controller rather than the default setting of matching the “x y z” coordinates. So if the datasets in different controllers have very different coordinate systems, this will look a bit random.

  • The next 3 buttons are actually “radio” buttons so they are mutually exclusive. They control how the overlay is thresholded.

  • Free Thresh is the default and you can set each controller with a different threshold.

  • Lock Val locks the actual value of the threshold (T or F or whatever it happens to be).

  • Lock pVal locks the calculated p-value of the overlay threshold (I find this more useful).

  • Lock Range will lock the range of values of each controller’s overlay. This will disable autoRange for all controllers. After you engage this, you can click autoRange in one controller to have all controllers match that range.

  • Lock Pbar will make all controller overlay color bars match. Without this selected you can have different colors for each controller etc..

  • The rest of the buttons allow you to select which controllers you want to lock together (A through J, although I think you can have more controllers than that..?)

../../_images/datamode_Lock_popup.png

Misc

  • The Misc button drops down the menu of miscellaneous options. note to staff: button help in the gui needs to be updated

  • Voxel Coords? will toggle the crosshair location from mm (the default) to voxel indexes.

  • Show Hints? will turn off (on is the default) the popup hints that appear when you hover the cursor over an element in the gui.

  • ULay Info and OLay Info will pop up a window that displays the output of 3dinfo for the underlay and overlay respectively.

  • Edit Environment will open the environment editor window to set or change environment variables. This button has the same functionality as the EditEnv button on the main controller window (See here.).

  • Edit 1DChain and Edit 2DChain open controllers for applying functions to your data. note to staff: I have no idea what these do…

  • Save Layout

../../_images/datamode_Misc_popup.png
../../_images/datamode_Misc.png

Plugins

  • The Plugins button drops down the menu of plugin programs loaded when AFNI started.

  • 3dsvm

  • Dataset NOTES

  • Dataset #2

  • Dataset #N

  • Draw Dataset

  • Edit Tagset

  • Histogram

  • Histogram: CC

  • Histogram: Multi

  • Maxima

  • Nudge Dataset

  • Render Dataset

  • ScatterPlot

  • Vol2Surf

../../_images/datamode_Plugins_popup.png
../../_images/datamode_Plugins.png

Jump within GUI Guide

Starting

Main controller

Image window

Graph window

Overlay panel

Datamode panel

Chooser menu

Maps